Schedule
Using the scheduling feature, you can switch data folders according to the schedule saved in the schedule file, or execute any application by configuring a Trigger.
Several predefined Triggers are available, including Hibernate(Windows) / Sleep(macOS), Restart, and Shutdown
To create or edit a schedule file, you need the SmartSignage Scheduler.
The SmartSignage Scheduler is a separate application from SmartSignage and must be installed independently.Note: The features described in this section are configured using the SmartSignage Scheduler.
Important:
If you operate the SmartSignage Scheduler and SmartSignage on different devices (PC or Mac), we strongly recommend using the same operating system on both.
For example, if SmartSignage runs on a Windows PC, the schedule should also be created on a Windows PC.A schedule file contains folder paths and other information. Since the path delimiters differ between Windows and macOS, this may cause issues.
Additionally, if you create a schedule on a device other than the one running SmartSignage, be sure to specify the correct data folder path for that environment.
Assignable Items
There are three types of items that can be assigned to a schedule: All Day Schedule, Time Schedule, and Trigger.
All Day Schedule
Specifies the data folder that SmartSignage will display.
When no Time Schedule is active, the content in the folder assigned to the All Day Schedule will be shown.
Time Schedule
Specifies the data folder that SmartSignage will display. By setting a start time and an end time, SmartSignage will show the content in the assigned data folder during that time period. Time can be configured in one‑minute increments, and the minimum duration that can be set is three minutes.
Example
- Start Time:
8:30 - End Time:
10:05 - Data Folder:
C:\Users\Fukuneko\Documents\signage\data1
With the settings above, the data folder will switch to
C:\Users\Fukuneko\Documents\signage\data1 at 8:30.
At 10:05, it will switch to another data folder.
The next data folder depends on the assigned schedule.
If another Time Schedule is configured to start at 10:05, SmartSignage will switch to the data folder specified in that Time Schedule.
If no Time Schedule is assigned at that time, SmartSignage will switch to the data folder specified in the All Day Schedule.
If no All Day Schedule is configured, SmartSignage will either display the data folder set in the application settings or show nothing (a black screen), depending on the configuration.
Trigger
Executes the specified application at the specified time. Multiple Triggers can be assigned to the same time slot. SmartSignage includes several built‑in Triggers—Shutdown, Restart, and Hibernate (Windows) / Sleep (macOS)—which can be selected directly. To execute any other application, add a Custom Trigger and specify the executable file and its arguments.
Triggers assigned to the same time are executed sequentially. Assigning too many Triggers at once is not recommended. Additionally, if both Shutdown and Restart are assigned to the same time, one of them may not execute.
Notes for macOS
To execute Shutdown, Restart, or Sleep on macOS, the user running SmartSignage must have permission to execute the shutdown command.
Run sudo visudo in Terminal and add the following line:
<user_name> ALL=(ALL) NOPASSWD: /sbin/shutdown
For more details, see:
How to execute shutdown on macOS
Schedule Targets
The available schedule targets are Date Specific, Holiday, Weekly, and Default.
Each target can have an All Day Schedule, Time Schedule, or Trigger assigned to it.
Priority
Schedule targets are evaluated in the following order of priority:
Date Specific ⇒ Holiday ⇒ Weekly ⇒ Default
Date Specific
This refers to a specific date, such as July 11, 2026.
If the current date matches a Date Specific schedule, that schedule is applied.
If no All Day Schedule, Time Schedule, or Trigger is assigned, the Date Specific schedule is considered Not Scheduled, and the Holiday schedule is checked next.Holiday
If the current date is a holiday, the Holiday schedule is applied.
Only one Holiday schedule can be configured.
If no All Day Schedule, Time Schedule, or Trigger is assigned, the Holiday schedule is considered Not Scheduled, and the Weekly schedule is checked next.Weekly
Weekly schedules are available for all seven days: Sunday, Monday, Tuesday, Wednesday, Thursday, Friday, and Saturday.
The schedule corresponding to the current day of the week is applied.
If no All Day Schedule, Time Schedule, or Trigger is assigned, the Weekly schedule is considered Not Scheduled, and the Default schedule is checked next.Default
If the Date Specific, Holiday, and Weekly schedules are all considered Not Scheduled, the Default schedule is applied.
If the Default schedule also has no All Day Schedule, Time Schedule, or Trigger, it is treated as Not Scheduled.
Conditions for “Not Scheduled”
A schedule is considered Not Scheduled when none of the following targets—Date Specific, Holiday, Weekly, or Default—has an All Day Schedule, Time Schedule, or Trigger assigned.
In addition to this, there are further conditions under which a schedule becomes Not Scheduled.
For any schedule target to be valid, it must have at least one of the following assigned:
an All Day Schedule, Time Schedule, or Trigger.
Even if a schedule is valid, it will still be treated as Not Scheduled under the following conditions:
No All Day Schedule is assigned.
There is no Time Schedule that matches the current time SmartSignage is running.
In other words, the schedule becomes Not Scheduled when no All Day Schedule is assigned and the current time falls outside all Time Schedules.
Additionally, if only Triggers are assigned—without an All Day Schedule or Time Schedule—the schedule is also treated as Not Scheduled.
Display Behavior When “Not Scheduled”
The display behavior when a schedule is Not Scheduled depends on the SmartSignage settings.
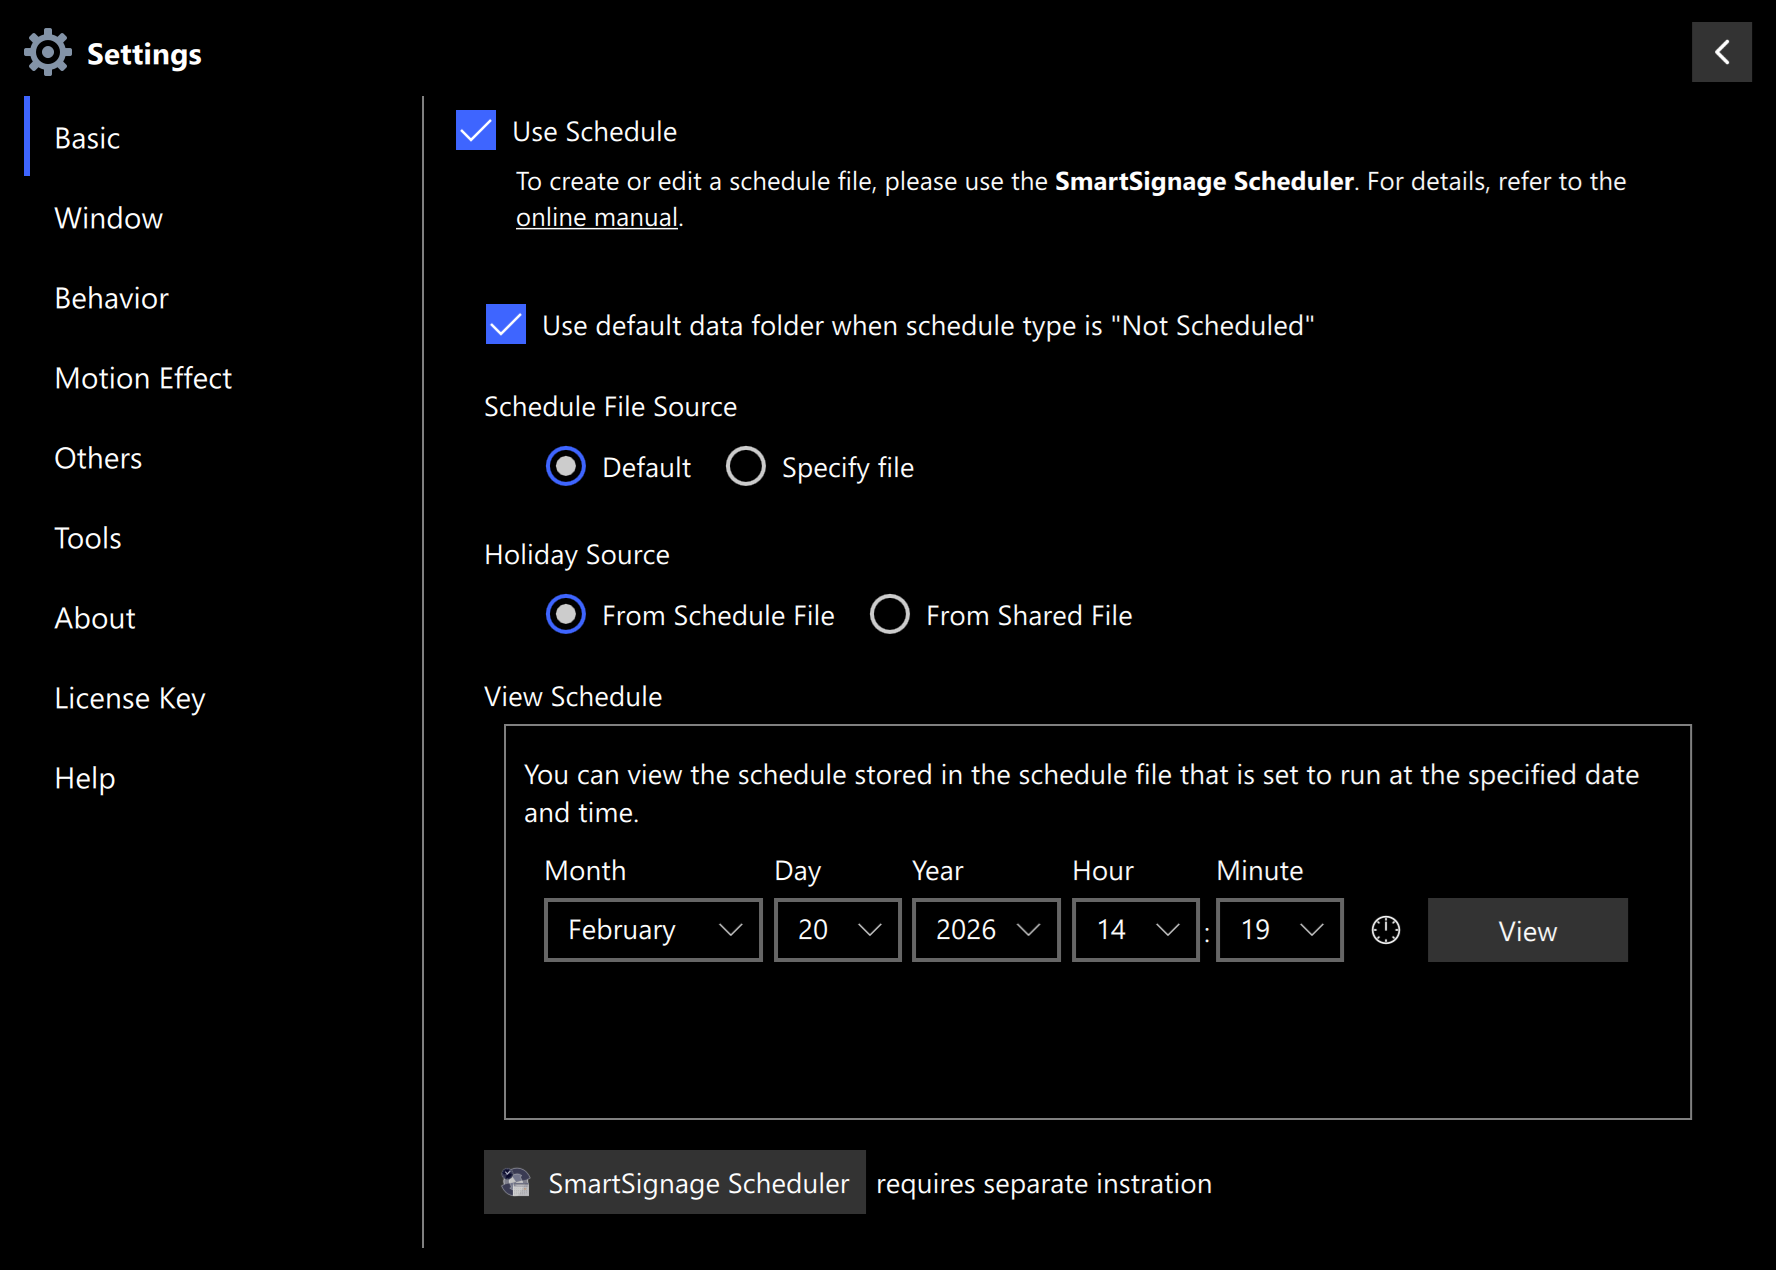
It is determined by the checkbox under Settings → Basic → Schedule labeled:
“Use the default data folder when the schedule type is ‘Not Scheduled’.”
- When the checkbox is enabled
SmartSignage displays the content in the folder specified as the Data Folder. - When the checkbox is disabled
The screen becomes completely black, and no content is displayed.
How to Check the Schedule
In SmartSignage, you can specify a date and time to see which schedule will be applied at that moment.
When you enable “Use Schedule” under Settings → Basic, the following screen appears:
View Schedule
You can view the schedule inside the rectangle under View Schedule.
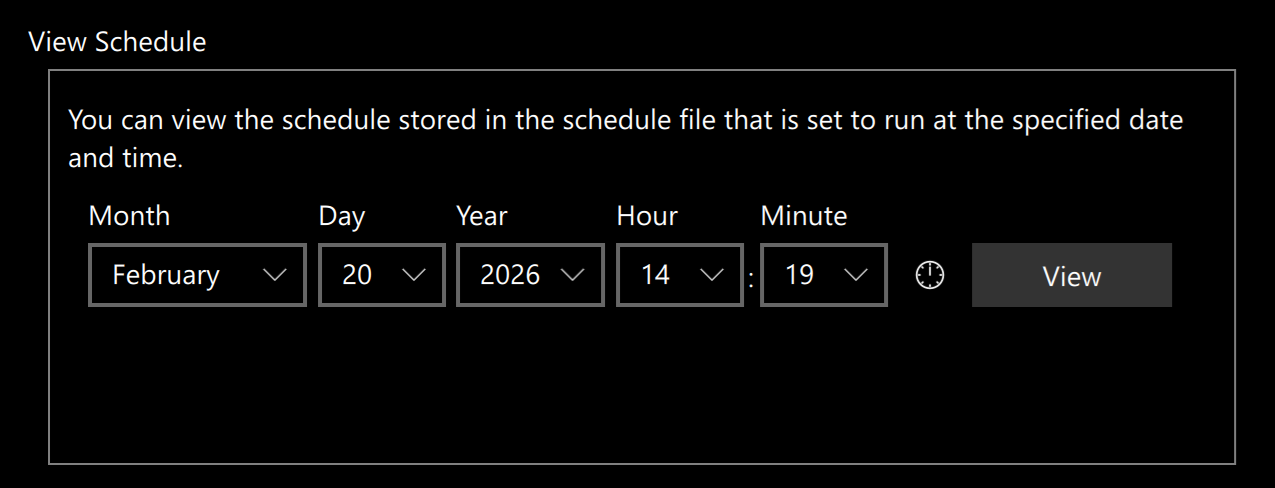
Specify the Year, Month, Day, Hour, and Minute, then press the View button to show the schedule that applies at that date and time.
Pressing
sets the fields to the current date and time.
Schedule Display Example 1
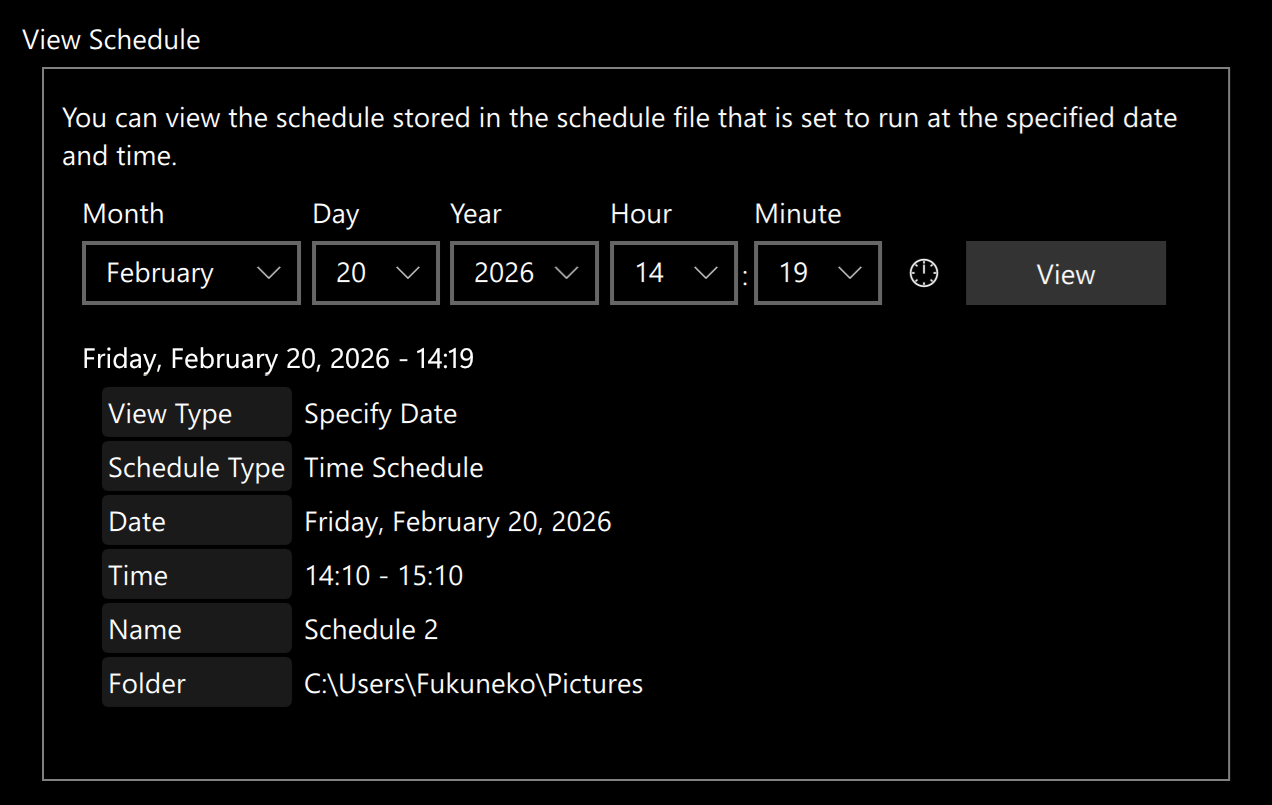
This example shows the result when you specify February 20, 2026, at 14:19 and press View.
A Time Schedule is assigned from 14:10 to 15:10, pointing to the folder C:\Users\Fukuneko\Pictures.
In other words, SmartSignage will display the contents of the C:\Users\Fukuneko\Pictures folder at 14:19 on February 20, 2026.
Schedule Display Example 2
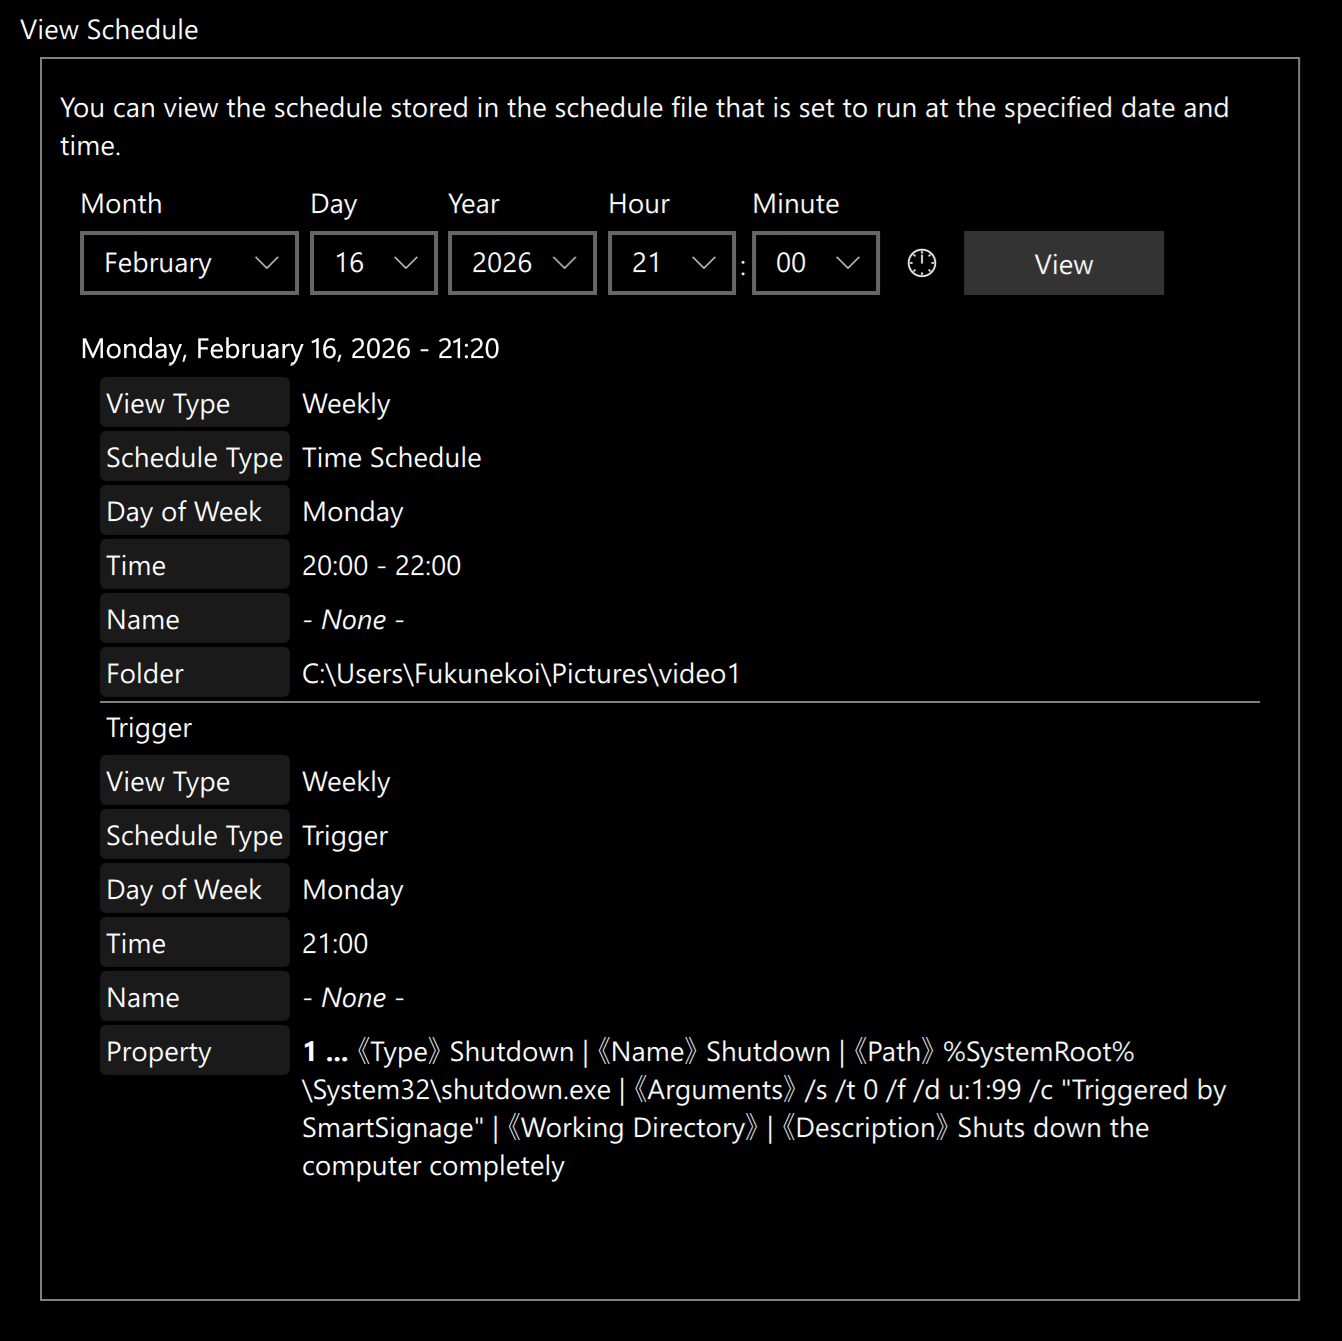
This example shows the result when you specify February 16, 2026, at 21:00 and press View.
A Time Schedule is assigned from 20:00 to 22:00, pointing to the C:\Users\Fukuneko\Pictures\video1 folder.
Because the View Type is set to Weekly and the Day of Week is Monday, SmartSignage applies the Monday schedule, even though no specific schedule is assigned to the calendar date February 16, 2026 itself.
In addition, a Trigger is also shown. This means that at 21:00 on February 16, 2026, the specified executable will run.
In this example, the trigger’s Type is Shutdown.
In other words, at 21:00 on February 16, 2026, SmartSignage will display the contents of the C:\Users\Fukuneko\Pictures\video1 folder, and then the PC will shut down.
Notes
This example shows the Windows version. As you can see from the use of%SystemRoot%in the Path field of the trigger, environment variables can be used in paths. These variables are expanded at runtime, so the actual path is typicallyC:\Windows\System32\shutdown.exe. (If the startup drive is different, the environment variable will expand accordingly.)On macOS, the shutdown command is executed via
sudoand calls/sbin/shutdown. You can also include environment variables in the path specified in a Custom Trigger. On macOS, environment variables begin with a$, such as$HOME.The differences in paths and environment variables between Windows and macOS are important. If the OS used to create the schedule (SmartSignage Scheduler) is different from the OS running SmartSignage itself—for example, creating the schedule on macOS but running SmartSignage on Windows—the folder paths and trigger paths will not match. In such cases, SmartSignage may not behave as intended.
For this reason, we recommend running the SmartSignage Scheduler and SmartSignage on the same operating system.
How to execute shutdown on macOS
To execute Shutdown, Restart, or Sleep on macOS, the user running SmartSignage must have permission to execute the shutdown command.
In most cases, this requires editing the /etc/sudoers file by running sudo visudo in Terminal.
The editor launched by isudo depends on your Terminal environment variables, but the default editor is vi.
Because vi uses unique key bindings and may be difficult for users who are not familiar with it, we recommend using another editor if necessary.
This section describes the standard procedure using vi, as well as an alternative method using the built‑in TextEdit application.
Please proceed with extreme caution when following these steps.
If the/etc/sudoersfile is edited incorrectly, macOS may fail to start.
Fukuneko Inc. assumes no responsibility for any issues that may arise.
If the user running SmartSignage is fukuneko, the procedure is as follows:
Standard Procedure (Editing with vi)
Because vi uses unique key bindings, the required key operations are also described below.
↩ indicates the Return key.
Run the following command in Terminal:
sudo visudo ↩
Enter your password if prompted.vi will start and open the /etc/sudoers file.
Note: The/etc/sudoersfile is protected and cannot normally be edited directly.Move to the end of the file:
SHIFT + G
…[Hold the Shift key and press G]Add a new line and enter Insert mode:
o
…[Press o (without Shift)]Enter the following line.
Replace fukuneko with the username (account name) you are using:
fukuneko ALL=(ALL) NOPASSWD: /sbin/shutdownSave and exit vi:
ESC : w q ↩
…[Press Esc, then:, thenw, thenq, then Return]
Using the Standard Text Editor (TextEdit)
If editing with vi is difficult, you can use the standard macOS editor to edit the file through a GUI.
Run the following command in Terminal:
sudo EDITOR='open -eW' visudo ↩Move to the end of the file and enter the following line.
Replace fukuneko with the username (account name) you are using:
fukuneko ALL=(ALL) NOPASSWD: /sbin/shutdownSave and close the editor:
⌘ + S
⌘ + Q
Using Other Editors
You can also use other editors by setting the EDITOR environment variable in the Terminal command.
For example, to use Visual Studio Code, enter the following:
sudo EDITOR='code --wait' visudo ↩